


Wonder Woman Special Quests and Mini Games
Check out all the special quests and mini games!
January 4th, 2021The Wonder Woman: The Themyscira Experience event is full of quests. Most of these are normal quests, but the more important quests either reward you with a special item, or are repeatable, thus increasing your capacity for earning more currency. Mini games are also great when it comes to rewards.
Below you'll find a list of all the special quests and mini games, how to complete them, and what the rewards will be, as well as a list of the special items you'll need for completing many of the quests.
To maximize your earning potential, be sure to check out our article on How to Make Money Fast in the Wonder Woman Event.
Note: Find a list of all quest-related NPCs, the quests they're involved in, and their locations, on the normal quests page. You can also find a list of all the main locations, along with other basic info including shops and items, on the main event page.
Contents
Special Item Quests
Quick Jump List:
- Get Pickaxe Parts 1, 2, and 3 - 50 GC Total, + Pickaxe
- Get Shovel Parts 1, 2, and 3 - 120 GC Total, + Shovel
- Get Spear Parts 1, 2, and 3 - 100 GC Total, + Spear
- Get Sword Parts 1, 2, and 3 - 60 GC Total, + Sword
- Upgrade Pickaxe Parts 01, 02, and 03 - 120 GC Total, + Upgraded Pickaxe
Get Pickaxe Parts 1, 2, and 3


Note: Find a list of all quest-related NPCs, the quests they're involved in, and their locations on the normal quests page. You can also find a list of all the main locations, along with other basic info including shops and items on the main event page.
Part 1 Description: Talk to Ara
Reward: 10 Gold Coins
Instructions:
- In the Armory, talk to the NPC named Timandra and hit Accept.
- Head back toward the entrance of the Armory to the NPC Artemis. Cross the bridge next to her and you'll find the NPC Ara.
- Walk near Ara and the quest will be complete.
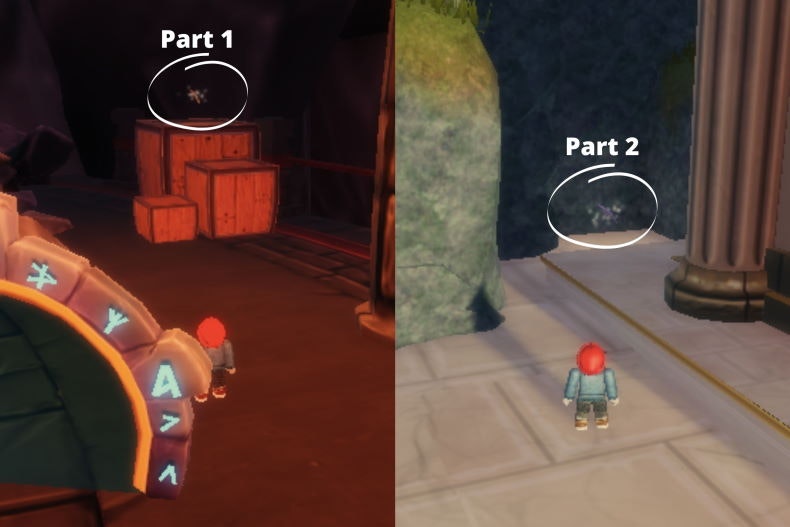
Part 2 Description: Collect pickaxe handle and top
Reward: 20 Gold Coins
Instructions:
- Talk to the NPC named Ara in the Armory and hit Accept.
- Find the pickaxe handle and top (use the picture above for additional help): Handle: After entering the Armory, take a left and you will find the handle behind the teleporter to Council Temple, on top of some boxes. Top: Exit the Armory and walk around to the back side of the building by the rocky cliff. There next to the cliff and the back corner of the building you'll find the top.
- Once you find both pieces, the quest will be complete.
Part 3 Description: Talk to Timandra
Reward: 20 Gold Coins + Pickaxe
Instructions:
Get Shovel Parts 1, 2, and 3

Note: Find a list of all quest-related NPCs, the quests they're involved in, and their locations on the normal quests page. You can also find a list of all the main locations, along with other basic info including shops and items on the main event page.
Part 1 Description: Search for Amazon Explorer Solla
Reward: 20 Gold Coins
Instructions:
- Talk to the NPC named Dilia inside the Armory. You will find her towards the back, down the long wooden path. Accept her request.
- Find the NPC named Solla. She will be down the stairs to the right of the Obby Challenge mini game portal.
- Once you walk near Solla the quest will be complete.
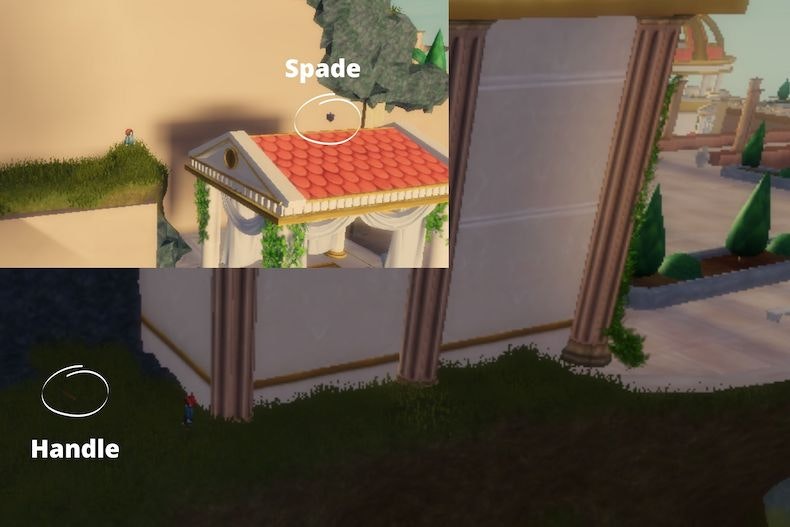
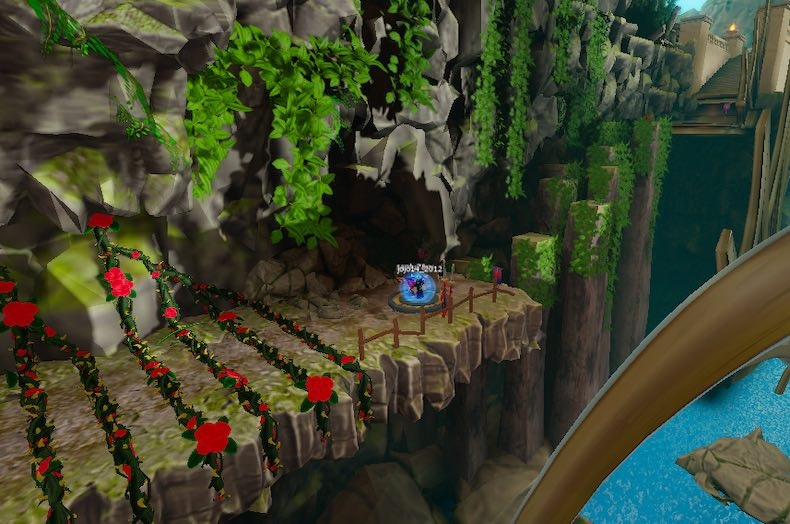
Part 2 Description: Find the shovel handle and spade
Reward: 50 Gold Coins
Instructions:
- After completing Get Shovel Part 1, talk to Solla and hit Accept.
- Find the two pieces of the shovel, using the image above and description below for hints.
- Spade: Leaving from the Oracles Temple, head up the stairs towards the waterfall. Right before you reach the water, turn left. The shovel spade is located on a red rooftop over this railing. To reach it, carefully jump onto the edge of the railing, then take a far jump down onto the red rooftop. OR you can jump off the ledge onto the grassy area, and then jump over to the red rooftop (as shown in image above).
- Handle: From the Oracles Temple, walk down the stairs and take a sharp right. Go over to the ledge that faces the water. Carefully walk onto the thin grassy area around to the back of the temple, and there you will find the shovel handle.
- Once you find both pieces the quest will be complete.
Part 3 Description: Return to Amazon Explorer Solla
Reward: 50 Gold Coins + Shovel
Instructions:
Get Spear Parts 1, 2, and 3


Note: Find a list of all quest-related NPCs, the quests they're involved in, and their locations on the normal quests page. You can also find a list of all the main locations, along with other basic info including shops and items on the main event page.
Part 1 Description: Speak to Amazon Metal Master Lo
Reward: 20 Gold Coins
Instructions:
- After starting Get Shovel Part 1 quest, talk to the NPC named Dilia in the Armory and hit Accept.
- After completing Get Sword Parts 1, 2, and 3 find Lo again in the Armory. The quest will complete when you go near her.
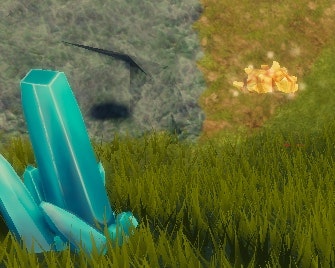
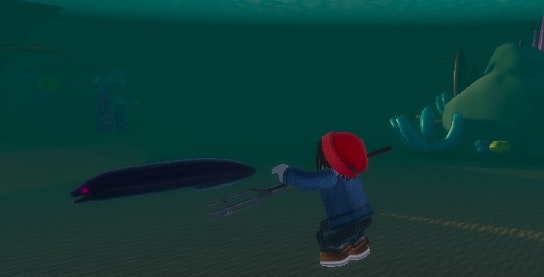
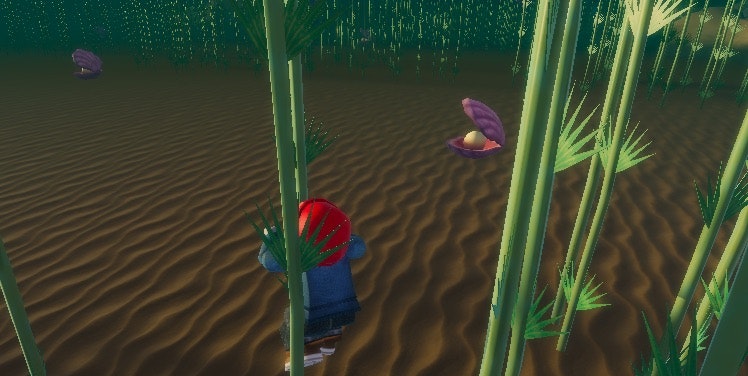
Part 2 Description: Find 5 Underwater Ingots
Reward: 40 Gold Coins
Instructions:
- After completing Get Spear Part 1 quest, talk to Lo and hit Accept.
- Exit the Armory and go around to the back side of the building where you will see a waterfall in the distance. Head toward that waterfall and jump into the water beneath it. (Note: This is the same area where you land after completing the Waterfall Jump quest, and right next to the Amazon Warrior Camp.)
- Swim around in that area until you collect all 5 of the sparkly blue ingots found in that area. These can be somewhat difficult to find so be thorough. The trickiest one is hidden between two underwater pillars as seen in the picture above. (Note: You can also find pearls nearby for the Pearls of Atlantis quests.)
Part 3 Description: Return to Metal Master Lo
Reward: 40 Gold Coins + Spear
Instructions:
Get Sword Parts 1, 2, and 3


Note: Find a list of all quest-related NPCs, the quests they're involved in, and their locations on the normal quests page. You can also find a list of all the main locations, along with other basic info including shops and items on the main event page.
Part 1 Description: Find the Amazon Metal Master Lo
Reward: 20 Gold Coins
Instructions:
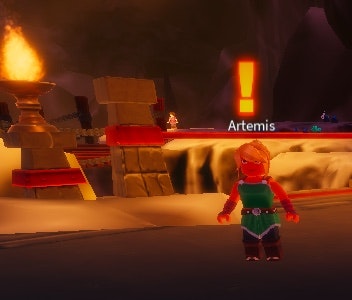
- In the Armory, talk to the NPC named Artemis and hit Accept.
- Head deeper into the Armory up to the lava waterfall where you'll find the NPC named Lo
- Walk near Lo and the quest will be complete.
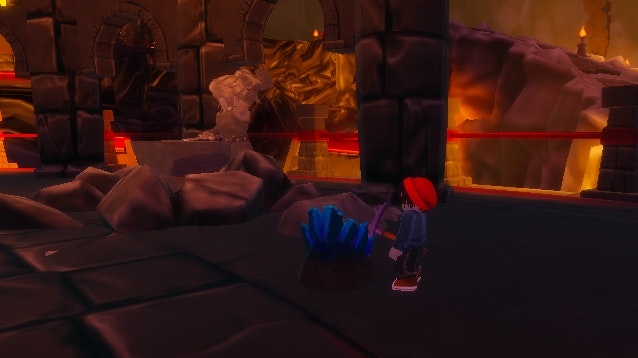
Part 2 Description: Find 5 metal ingots
Reward: 20 Gold Coins
Instructions:
- Talk to the NPC named Lo in the Armory and hit Accept.
- Find the five ingots. -Ingot 1: Nearby, right next to Lo. -Ingot 2: Head partway back on the path toward the entrance of the Armory, then cross the bridge on the left. Be sure to jump over the holes, or walk across the chain railway. -Ingot 3: Cross the bridge located near the NPC Artemis, then find the ingot to the right past the NPC Ara. -Ingot 4: Cross another bridge after gaining Ingot 3 and you'll find another ingot. -Ingot 5: From the entrance of the Armory, go left and find a pathway on the right. Then on the left will be another bridge to cross, after which you'll find the fifth ingot.
- Once you find all the ingots, the quest will be complete.
Part 3 Description: Take the ingots back to Lo
Reward: 20 Gold Coins + Sword
Instructions:
Upgrade Pickaxe Parts 01, 02, and 03


Note: Find a list of all quest-related NPCs, the quests they're involved in, and their locations on the normal quests page. You can also find a list of all the main locations, along with other basic info including shops and items on the main event page.
Part 1 Description: Find the Amazon Mountain Miner Alekto
Reward: 20 Gold Coins
Instructions:
- After starting the Get Shovel Part 1 and Get Spear Part 1 quests and completing the Get Pickaxe Part 3 quest, talk to the NPC named Dilia in the Armory and hit Accept.
- Find the NPC named Alekto at the base of the part of the mountain that has vines to climb up, to the right of the waterfall. When you step near Alekto, the quest will be complete.
Part 2 Description: Find 5 Golden Nuggets
Reward: 50 Gold Coins
Instructions:
- After completing Upgrade Pickaxe Part 01, talk to the NPC named Alekto and hit Accept.
- Find the Golden Nuggets:
- Nugget 1: Up two vines and straight ahead near the next cliff.
- Nugget 2: Up the next vine and around the other side of the mound with the bouncer.
- Nugget 3: Up the bouncer and around the right side of the giant statue.
- Nugget 4: Down the big rock toward the high waterfall you jumped off for the Waterfall Jump quest, in the grass on the left side of the river.
- Nugget 5: Go all the way back up to the giant statue, then head off the cliff to the left of the elevator to land at the top of the central waterfall to find the final Nugget
- Once you find all 5 Golden Nuggets, the quest will be complete.
Part 3 Description: Take the golden nuggets to Lo
Reward: 50 Gold Coins + Upgraded Pickaxe
Instructions:
- After completing Upgrade Pickaxe Part 02, talk to the NPC named Lo again.
- Lo will then upgrade your Pickaxe and the quest will be complete. Be sure to collect the pickaxe upgrade in your quest menu so you can use it in future quests!
Repeatable Quests
These are the most valuable quests because you can repeat them again and again to earn as many Gold Coins as you want!
Most of the Repeatable Quests require one of the Special Items so be sure to check what you need before attempting these quests.
Quick Jump List:
- Corrupted Eels Part 4 - 100 GC, Requires Spear
- Food Fight Part 04 - 750 GC, Complete in Food Fight Mini Game
- Gems of Themyscira Part 4 - 100 GC, Requires Pickaxe
- Kill More Corrupted Rats - 100 GC, Requires Sword
- Lost Treasures Part 4 - 1,000 GC, Requires Shovel
- Mighty Crystals Part 04 - 600 GC, Requires Upgraded Pickaxe
- Pearls of Atlantis Part 3 - 100 GC
Corrupted Eels Part 4


Note: Find a list of all normal quests and quest-related NPCs, the quests they're involved in, and their locations on the normal quests page. You can also find a list of all the main locations, along with other basic info including shops and items on the main event page.
Description: Kill 25 Corrupted Eels
Reward: 100 Gold Coins
Instructions:
- After completing the Corrupted Eels Parts 1, 2, and 3 normal quests, talk to the NPC named Serlus outside on the large beach again and hit Accept.
- Follow the same instructions as for the Corrupted Eels normal quests, except this time kill 25 eels.
- Once you kill all 25 eels, the quest will be complete and you can repeat it as many times as you like.
Food Fight Part 04


Note: Find a list of all normal quests and quest-related NPCs, the quests they're involved in, and their locations on the normal quests page. You can also find a list of all the main locations, along with other basic info including shops and items on the main event page.
Description: Play the Food Fight Minigame 7 times
Reward: 750 Gold Coins
Instructions:
- After completing Food Fight Parts 01, 02, and 03 normal quests, talk to the NPC named Trina again and hit Accept.
- Follow the same instructions as for the Food Fight Part 01 normal quest quest, except this time play 7 games.
- After playing 7 new games, once you leave the Food Fight Minigame, you will have completed the quest.
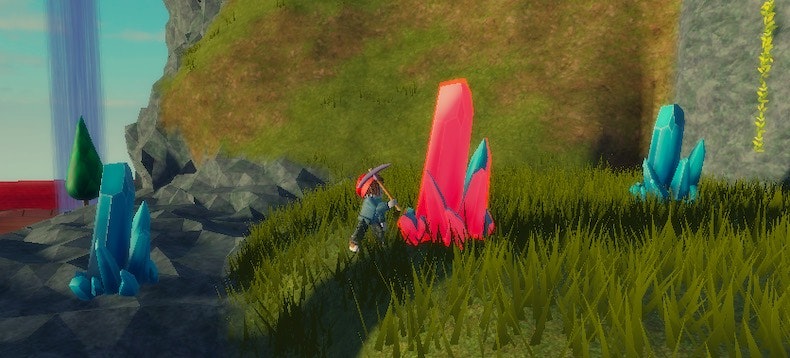
Gems of Themyscira Part 4


Note: Find a list of all normal quests and quest-related NPCs, the quests they're involved in, and their locations on the normal quests page. You can also find a list of all the main locations, along with other basic info including shops and items on the main event page.
Description: Mine 25 Gems
Reward: 100 Gold Coins
Instructions:
- After completing Gems of Themyscira Parts 1, 2, and 3 normal quests, talk to the NPC named Euboea again and hit Accept.
- Follow the same instructions as for the other Gems of Themyscira normal quests, except this time mine 25 gems.
- Once you mine 25 gems, the quest will be complete and you can repeat it as many times as you like.
Kill More Corrupted Rats


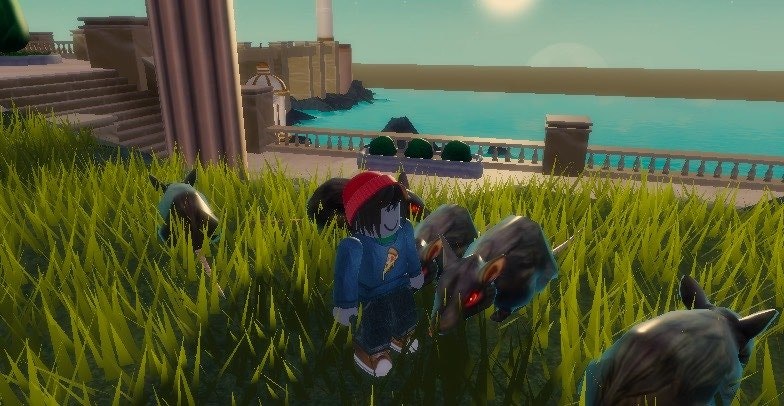
Note: Find a list of all normal quests and quest-related NPCs, the quests they're involved in, and their locations on the normal quests page. You can also find a list of all the main locations, along with other basic info including shops and items on the main event page.
Description: Kill 25 Corrupted Rats
Reward: 100 Gold Coins
Instructions:
- After completing Corrupted Rats Parts 1, 2, and 3 normal quests, talk to the NPC named Aella outside to the left behind the Council Temple again and hit Accept.
- Follow the same instructions as for the Corrupted Rats normal quests, except this time kill 25 rats.
- Once you kill all 25 rats, the quest will be complete and you can repeat it as many times as you like.
Lost Treasures Part 4


Note: Find a list of all normal quests and quest-related NPCs, the quests they're involved in, and their locations on the normal quests page. You can also find a list of all the main locations, along with other basic info including shops and items on the main event page.
Description: Dig 10 Buried Treasures
Reward: 1,000 Gold Coins
Instructions:
- After completing Lost Treasures Parts 1, 2, and 3 normal quests, talk to the NPC named Solla again and hit Accept.
- Follow the same instructions as for the Lost Treasures normal quests, except this time find 10 buries treasures.
- Once you find 10 buried treasures, the quest will be complete and you can repeat it as many times as you like. Note: The treasures for this quest do not respawn very frequently so one way to do this somewhat painlessly is to zoom all the way out and get a bird's eye view so that you can see as much of the area is possible (see an example in the Lost Treasures Quest section of the How to Get Gold Coins Quickly in the Wonder Woman Event article). Then just wait around until you see a red X appear and hope you can run to it before someone else does!
Mighty Crystals Part 04


Note: Find a list of all normal quests and quest-related NPCs, the quests they're involved in, and their locations on the normal quests page. You can also find a list of all the main locations, along with other basic info including shops and items on the main event page.
Description: Mine 25 Crystals
Reward: 600 Gold Coins
Instructions:
- After completing the Mighty Crystals Part 03 normal quest, talk to Alekto and hit Accept.
- Follow the same instructions as for Part 02, except this time you will have to mine 25 crystals.
- Once you mine 25 crystals, the quest will be complete.
Pearls of Atlantis Part 3


Note: Find a list of all normal quests and quest-related NPCs, the quests they're involved in, and their locations on the normal quests page. You can also find a list of all the main locations, along with other basic info including shops and items on the main event page.
Description: Collect 25 Pearls
Reward: 100 Gold Coins
Instructions:
- After completing the Pearls of Atlantis Parts 1 and 2 normal quests, talk to the NPC named Acantha again and hit Accept.
- Follow the same instructions as for the Pearls of Atlantis normal quests quests, except this time find 25 pearls.
- Once you find 25 pearls, the quest will be complete and you can repeat it as many times as you like.
Mini Games
Quick Jump List:
Mini Game 01: Obby Challenge


Note: Find a list of all the main locations, along with other basic info including shops and items on the main event page.
Location: Outside the right-side exit of the Council Temple and up the stairs.
Game Mechanics:
- The Obby Challenge Mini Game is pretty straight-forward: it's an obstacle course. In order to complete it, you'll have to be good at your controls, especially at jumping.
- Once you reach the first check point, the timer begins, so keep an eye on that if you're trying to complete the Amazon Obby Parts 01, 02, and 03 normal quests.
- Falling, or hitting something you're not supposed to (such as spikey vines) will kill you. After a few seconds you'll respawn at the most recent check point.
- In between most sections there will be check points so once you complete a section, you won't have to do it again unless you exit the game.
Strategy:
- Sometimes switching to a verticle angle can increase jumping accuracy.
- If you're playing on a computer, holding down the Shift key as you run will make you run faster.
- There are rumors that different outfits or avatar body types may jump better than others, but we haven't found any confirmation of this.
- If you're playing on a computer, rapidly alternating between the A and D keys (left and right) while in the air might make you jump farther.
- There are also some reports of bugs that allow you to skip sections, etc.
Quests:
- Amazon Obby Challenge Parts 01, 02, and 03 normal quests - 1,600 GC Total
- Amazon Obby Parts 01, 02, and 03 normal quests - 550 GC Total
- Possibly More!
Mini Game 02: Food Fight
Note: Find a list of all the main locations, along with other basic info including shops and items on the main event page.
Location: Outside the left-side exit of the Council Temple, up the stairs, then up another set of stairs to the right.
Game Mechanics:
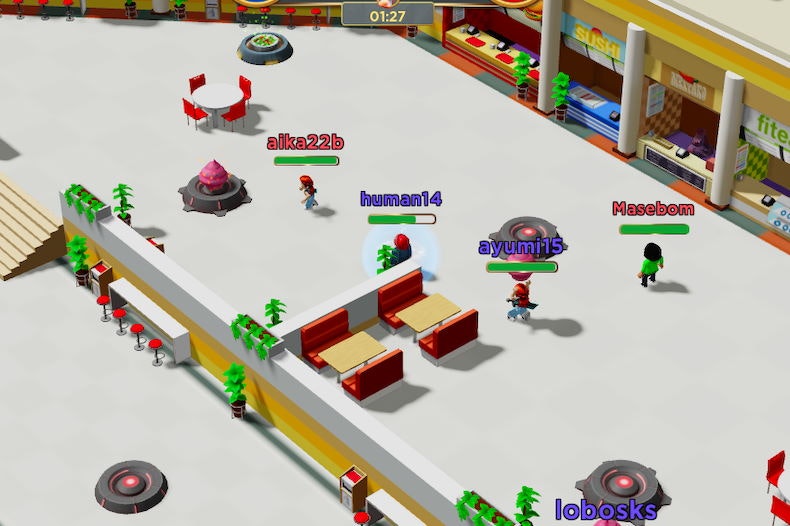
- The Food Fight Mini Game is played in a series of 5-minute matches between two teams.
- Upon joining the Food Fight Mini Game, you will be automatically assigned to a team, either the blue Heroes or the red Baddies.
- Also upon entering, you will see one of three things:
- If you see the words, "Waiting for players..." that means the game is between matches and no points will be awarded for killing enemies.
- If you see the words, "The match is about to begin!" it's still in between matches like above, but as you may have guessed, the match is about ti begin.
- If you don't see words like that, you'll instead see a small timer at the top of the screen which indicates how much time remains of the current match.
- Dispersed throughout the room are devices that generate plates of various types of food, and each type is different. Typically the more powerful foods are generated in the center area, but they also take a longer time to regenerate.
- All green salad type foods will heal your health--The plates heal a small amount and the bowls heal a larger amount.
- All of the other foods are used as weapons against the other team.
- If you throw something at someone from your own team, they will not be hit. The way to tell who is on your team is by the color of their name. If the color matches yours, you’re on the same team.
- When you get hit by food, you will lose some amount of health, depending on what type of food you were hit by.
- Once you run out of health your character will break into pieces, then after a few seconds respawn at the starting point for your team.
- Each time someone runs out of health, a point will be awarded to the other team.
- As mentioned above, the game happens in timed matches. You will know when a new round begins because it will reset everyone to their starting spawn place. You will know when the round is over because there will be big words on the screen of either "Victory" or "Defeat", depending on whether your team won or lost.
- Once a match is over, it typically takes less than a minute for the next one to begin. However, this may change depending on whether there are other players to play with.
Strategy:
- Pay attention to what each different type of food does when hitting an enemy. Some throw faster or slower, and some hit harder than others. (See below for more on this.)
- When you're hit you'll be temporarily slowed down, so a big part of this game is managing to throw food at someone (and hit them) before they can do the same to you.
- You run faster when you're not carrying food. This means if someone is coming after you with a giant cake and you don't have a clear shot at them, it might be a better idea to throw your food and run away.
- The foods can fly pretty long distances, so throwing at someone way across the room is a great way to make a hit while avoiding getting hit yourself.
- If you are just trying to complete the quests, stick with the cupcakes and sushi rolls. For the quest purposes there's really no reason to use the harder-hitting items since your goals are to hit more enemies, not kill them or win more rounds. By sticking with the easier-to-aim items, your chances of making more hits in less time are much higher.
Food Types and Behavior:
- Salad--Heals your health; Plates heal a little, bowls heal a lot.
- Cupcake--Easy to aim, deals a small amount of damage.
- Sushi--Easy to aim, deals a small amount of damage.
- Hamburger--Harder to aim, deals a medium amount of damage.
- Pizza--Harder to aim, deals a medium amount of damage.
- Spaghetti--Harder to aim, deals a large amount of damage.
- Cake--Harder to aim, deals a large amount of damange.
Quests:
- Food Fight Parts 01-03 normal quests - 650 GC Total
- Food Fight Challenge Parts 01-04 normal quests - 6,400 GC Total
- Food Fight Part 04 - 500 GC, Repeatable
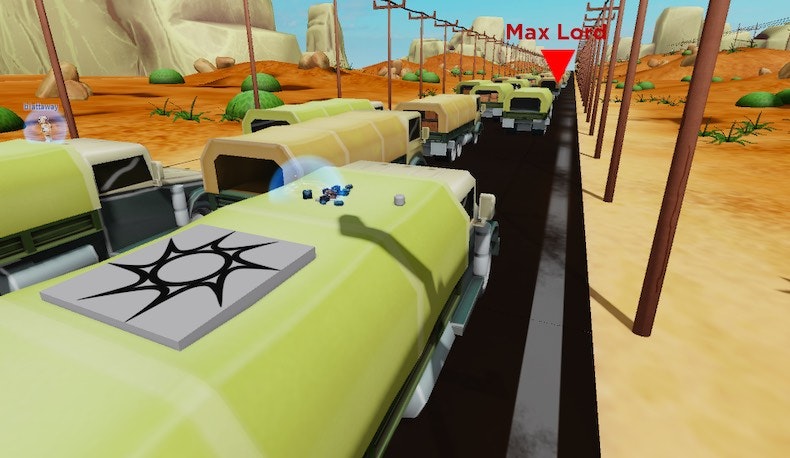
Mini Game 03: Max Lord Chase


Note: Find a list of all the main locations, along with other basic info including shops and items on the main event page.
Location: To the right of the entrance to the Oracles Temple.
Game Mechanics:
- The Max Lord Chase Mini Game takes place on top of trucks driving in the dessert. The goal is to jump across the trucks and reach Max Lord before the other players do.
- Although each player is assigned to a team, only one player can win so it's really everyone for themself out there.
- Some of the trucks move back and forth, and there are obstacles thrown at you with red warnings.
Strategy:
- Jumping twice can sometimes help you make it onto a truck even if the first jump was a little short and you landed just off the edge.
- The large crate obstacles can be avoided by standing on the very edge of a truck, so you don't necessarily have to jump onto another one when you see the warning.
Quests:
- Max Lord Challenge Parts 01 and 02 normal quests - 1,050 GC Total
- Max Lord Parts 01, 02, and 03 normal quests - 650 GC Total
- Possibly More!
Mini Game 04: Bunker Fight


Note: Find a list of all the main locations, along with other basic info including shops and items on the main event page.
Location: To the left of the entrance to the Oracles Temple.
Game Mechanics:
- The goal of the Bunker Fight Mini Game is to defeat the Cheetah three times by throwing boulders at her before she defeats you the same way.
- The only way to get the boulders is to dodge the ones thrown at you by the Cheetah. They will then usually roll forward so you can grab them and throw.
- Both you and the Cheetah will start out with three hearts of life. When either of you gets hit by a boulder you will lose half a heart.
- You have to drain the Cheetah's life completely three times without dying, and the third time she will come back with five hearts instead of three!
- You can block the boulders by pressing the space bar (if you're on a computer), which will make the rock disappear without injuring you. It will also slow you down temporarily and take some time to recharge.
Strategy:
- The key if you want to win quickly is to get as many boulders as you can as quickly as possible. This means it's better to dodge than to block, as blocking will make the boulders disappear.
- Only one boulder can be on the ground at a time, but there can be two boulders on your side if you're holding one. Therefore, a good strategy is to hold a boulder, wait for the Cheetah to throw another one, dodge it, and throw your boulder at her right afterward. This time you'll continue with an endless supply of boulders!
- If you and the Cheetah throw boulders at each other at the same time, the Cheetah's boulder will disappear without hitting you while your boulder will still hit her.
- You can throw boulders from anywhere on the platform so a good method it to zoom out and stay farther back on the platform, away from the Cheetah, and in the center when possible. This way you can dodge easier and see where the boulders have rolled to in order to pick them up.
- We noticed a few bugs in this game. One is that sometimes if you choose to leave right after a match, your wins and/or time may not apply to your quest goals. Instead, hit Yes when asked whether you want a rematch, then just quit out of the game if you want to.
- Another bug is that if you hit Yes for a rematch and continue playing, the Cheetah may still lay there in defeat. This makes winning again impossible as she will not throw anymore boulders so you will be fored to exit out of the game.
Quests:
- Bunker Fight Challenge Parts 01 and 02 normal quests - 600 GC Total
- Bunker Fight 01 and 02 normal quests - 150 GC Total
- And More!
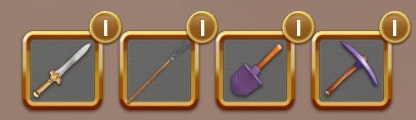
Special Items
Special Items are gained by completing the Special Item Quests. You can then use them to complete other quests and earn tons of Gold Coins!


Pickaxe


The Pickaxe is gained through completing the Get Pickaxe Parts 1, 2, and 3 quests. It can then be used for various other quests involving mining.
The Pickaxe can also be upgraded via the Upgrade Pickaxe Parts 01, 02, and 03 quest line. This will open up more quests.
Here's a list of quests using the Pickaxe:
- Gems of Themyscira Parts 1, 2, and 3 normal quests - 70 GC Total
- Gems of Themyscira Part 4 - 100 GC, Repeatable
- Mighty Crystals Parts 01, 02, and 03 normal quests - 350 GC Total, Requires Upgraded Pickaxe
- Mighty Crystals Part 04 - 600 GC, Repeatable, Requires Upgraded Pickaxe
Shovel


The Shovel is gained through completing the Get Shovel Parts 1, 2, and 3 quests. It can then be used for various other quests involving digging.
Here's a list of quests using the Shovel:
- Lost Treasures Parts 1, 2, and 3 normal quests - 320 GC
- Lost Treasures Part 4 - 1,000 GC, Repeatable
Spear


The Spear is gained through completing the Get Spear Parts 1, 2, and 3 quests. It can then be used for various other quests involving underwater hunting.
Here's a list of quests using the Spear:
Corrupted Eels Parts 1, 2, and 3 [normal quests](/news/wonder-woman-themyscira-event-normal-quests-guide/) - 80 GC Total[Corrupted Eels Part 4](#corruptedeelspart4) - 100 GC, [Repeatable](#repeatablequests)
Sword


The Sword is gained through completing the Get Sword Parts 1, 2, and 3 quests. It can then be used for various other quests involving fighting.
Here's a list of quests using the Sword:
- Corrupted Rats Parts 1, 2, and 3 normal quests - 90 GC Total
- Kill More Corrupted Rats - 100 GC, Repeatable